Sunday, March 20, 2022 by Nate Bross
One of my side projects is https://time2temp.com — a simple site for checking bbq times and temperatures. When I originally put the site up, I grabbed an html5up theme, slapped some inline Vue templates, and a bit of javascript to load it up.
It worked, but it was HEAVY: 20 network requests over 500kb!
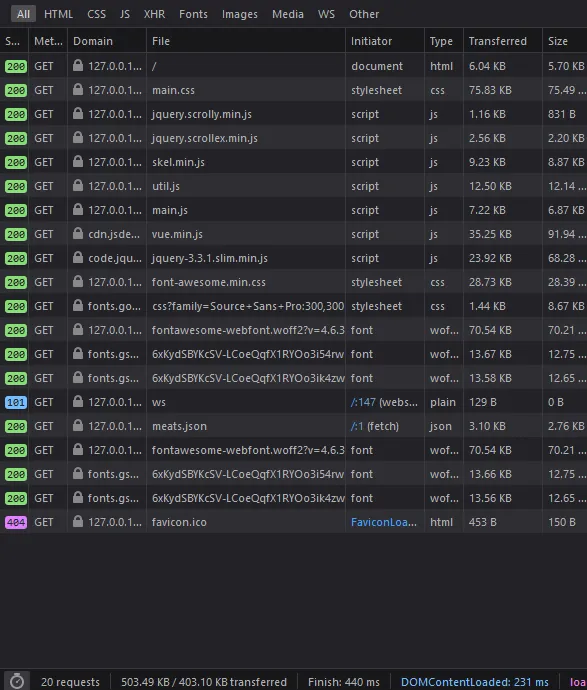
To serve a single “page” that essentially has a list, that was wildly overkill. How can I make that more simple and more fast?
Drop the framework, and more importantly, drop the bloated CSS theme that included tons of features not used in my simple one page site.
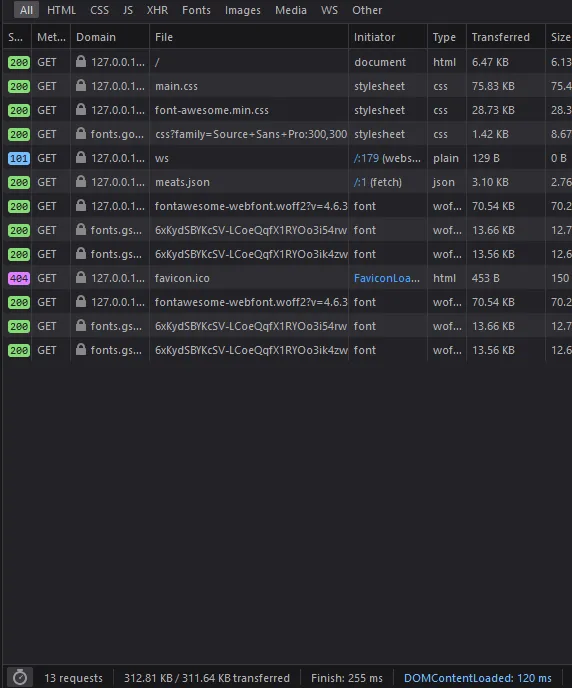
Finally, trimming down the bloated theme and pulling out only the few parts I was actually using resulted in a much slimmer, and by extension faster site that is cheaper to operate:
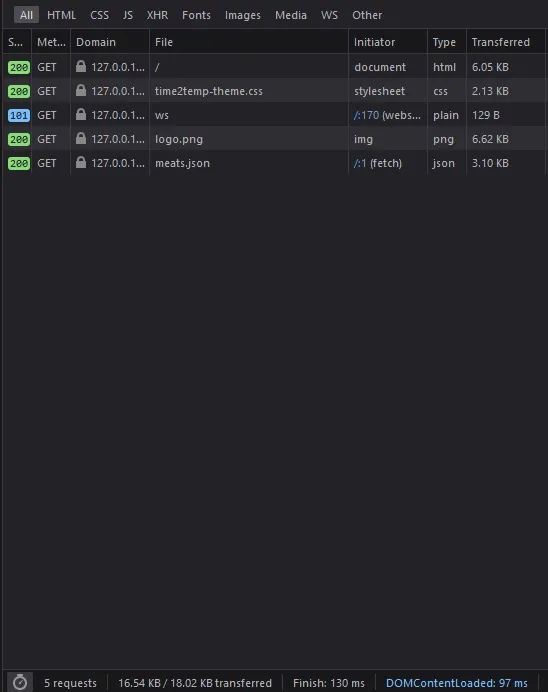
I also converted the logo from a fancy css based thing to a purely static png one, that is only 6kb. That was a huge savings in terms of data transfer.
Tuesday, March 8, 2022 by Nate Bross
I love coffee, and cold coffee is my favorite. I often get asked about my cold brew process, so I’m writing it down to share with everyone.
Equipment
You can use any equipment you like, but here’s what you will need.
- Two containers (roughly equal size) and large enough to hold your cold brew.
- Sieve / Coffee filters.
I use a pair of large mason jars, because they have measurements on the side which is helpful for the Process.
Process
Preparing a batch
I start with a 3:1 ratio of water to grounds.
- I put the grounds into my mason jar, filling about to the 500ml line.
- Fill to 1750ml line with cold water.
- Shake or stir the mixture up to ensure all grounds are wet.
- Throw it in the fridge for 18-24 hours.
It doesn’t hurt to stir up the batch once or twice while its in the fridge cold brewing, just make sure not to do it right before you strain it out, as that’ll make it more difficult to get the grounds out.
Handling a steeped/brewed batch
Strain the grounds out, I use my sieve to go between my two jars a couple times, to catch the most grounds as possible.
Once you have strained to your satisfaction, you now have cold brew concentrate!
Results
The above process makes a nice concentrate. I recommend diluting with a 60/40 concentrate to additional cold water mixture, though you will want to zero in on the exact amount of additional water you want to add to your concentrate.
Thursday, March 3, 2022 by Nate Bross
Nuxt has a built-in sitemap generator plugin, which is great! The content plugin also has a nice section on integrating with the sitemap plugin. Those were really useful starting points for me, but I had a few special requirements.
- specify
lastmod appropriately
- specify priority to posts over lists
- customize
changefreq for some of the built-in mapped pages
I ended up with the following nuxt.config.js section to accommodate my use:
sitemap: {
  hostname: 'https://www.brosstribe.com',
  gzip: true,
  routes: async () => {
    const routes = [];

    const { $content } = require('@nuxt/content');
    const files = await $content({ deep: true })
      .only(['path', 'lastMod', 'date'])
      .fetch();

    routes.push({
      url: '/',
      changefreq: 'weekly',
      priority: 0.5
    });

    routes.push({
      url: '/blog',
      changefreq: 'weekly',
      priority: 0.75
    });

    for (const file of files) {
      routes.push({
        url: file.path === '/index' ? '/' : file.path,
        changefreq: 'yearly',
        priority: 1,
        lastmod: file.lastMod || file.date
      });
    }

    return routes;
  }
}
This allows me to specify that my posts don’t change often, but I do go in and fix typos or make updates occasionally so I don’t want them flagged as never I also wanted them to take priority over my home and blog list pages. So I set their priority to 1, and the root page and the /blog page to lower priority relative to my posts.
The other thing I wanted to include was my lastmod flag, which I track in Nuxt Content using front matter.
---
date: 2022-03-04
lastMod: 2022-03-04
---
Note that I had to update my Content query to include my fields, and then specify them:
const files = await $content({ deep: true })
      .only(['path', 'lastMod', 'date'])
      .fetch();
///
{
  lastmod: file.lastMod || file.date
}
this says use the last modification date, otherwise the created date.
Overall this function is fairly bloated, but given that nuxt.config.js is essentially a dumping ground of all of the various plugin configs, mine is small enough right now it wasn’t worth making a separate file and importing that; however, that is a viable route mentioned in the sitemap plugin’s docs.
Monday, February 28, 2022 by Nate Bross
Hooking up Azure Static Web Apps to a Github repository is very easy and works incredibly well.
Using Github actions, and a managed secret deployment key on the Azure side, the I used the default integration yml generated by Azure to set up continuous integration action. Out of the box, it creates a new environment for each pull request on the repository with a unique url. This is a useful feature for managing different experimental paths and seeing how it looks on an “almost” production site.
The one thing I did to make this work with my Nuxt static site, is I use the
app_build_command: "npm run generate"
as opposed to the built-in script, which I think is
npm run build
and this allows me to have my static site generated and fully rendered by the Nuxt tooling and pushed up to the Azure Static Web App.
Friday, August 20, 2021 by Nate Bross
The site has been hosted on Umbraco for many years, prior to that it was a windows live spaces blog, and before that I forget… Technology moves fast, and has long been time to switch platforms.
I have wanted to switch to a markdown based blog for a while. First, to see if I can do it; but also to reduce the need for a database and app service to run the blog. Just a static site generated when I make changes is plenty.
Setting up routing
The standard nuxt content module blog suggests using a slug system to route blog content. For a simple blog, that would probably work, but I don’t like the way it guides you to drop all content in a single folder. It was also difficult to get working with any kind of sub folder system.
I wanted to have a system like this
- content/blog
- content/blog/archive
- content/blog/archive/post1.md
- content/blog/2018/post5.md
- content/blog/2019/post15.md
To support this kind of folder structure, and keep sane routing, following the default nuxt content system works very well. I ended up with a simple _.vue file in the main pages folder.
<template>
  <div>
    <article>
      <h1>{{ article.title }}</h1>
      <p class="article-meta">
        {{ formatDate(article.date) }}
        by <a href="#">{{ article.author.name }}</a>
      </p>
      <nuxt-content :document="article" />
    </article>
  </div>
</template>
<script>
export default {
  async asyncData({ $content, params }) {
    const article = await $content(params.pathMatch).fetch();
    return { article };
  },
  methods: {
    formatDate(input) {
      // fix day behind issue
      // https://stackoverflow.com/a/45407500/86860

      // Date object a day behind
      const utcDate = new Date(input);
      // local Date
      const localDate = new Date(
        utcDate.getTime() + utcDate.getTimezoneOffset() * 60000
      );

      return localDate.toLocaleDateString('en-US', {
        weekday: 'long',
        year: 'numeric',
        month: 'long',
        day: 'numeric'
      });
    }
  }
};
</script>
I’ve included a little date formatter here, that converts the string date tag stored in the markdown files, and converts it to the users local timezone (this prevents the day behind issue noted in the comment).
This makes for very simple system of writing and managing my main content, and keeps the routing very simple:
<NuxtLink :to="article.path">
  {{ article.title }}
</NuxtLink>
Handling images
Dealing with images in the content was a little tricky, but with a bit of a searching the solution is to enable components in content.
First, ensure that nuxt.config.js has components enabled:
export default {
  components: true
}
Then setup an image binding component in components/global, which I found a great example of here: https://woetflow.com/posts/working-with-images-in-nuxt-content/.
<script>
export default {
  props: {
    src: {
      type: String,
      required: true
    },
    alt: {
      type: String,
      required: true
    }
  },
  methods: {
    imgSrc() {
      try {
        return require(`~/assets/images/${this.src}`);
      } catch (error) {
        return null;
      }
    }
  }
};
</script>
<template>
  <img :src="imgSrc()" :alt="alt" class="inline-max" />
</template>

<style scoped>
.inline-max {
  max-width: 100%;
}
</style>
Doing this pushes all the images through webpack, but means that referencing them in a markdown file is pretty easy:
<content-image
  src="folder/file.png"
  alt="alt text"></content-image>
Looking Forward
This was a really fun project. I’ve simplified my website setup, using a static site generator to make the full website at build time.
This should also make it easier to try out some interesting interactive components inside blog posts and I hope to take advantage of that in future posts.
Friday, June 18, 2021 by Nate Bross
Someone asked on Stack Overflow:
I have an application that allows users to login using their own Identity Provider. We use the standard .AddOpenIdConnect(...); middleware and this works perfectly for most users.
It is using .SaveTokens = false; and the app is requesting .ResponseType = "code id_token";.
There are some users that have an obscene amount of claims, and this causes the following flow
- User logs in to IDP.
form_post back to /signin-oidc- that returns a 302 redirect to my
ExternalLoginCallback action in my controller
The problem is that on #2, the users with a large number of claims generate an authentication cookie that is > 16kb, which appears to be a hard IIS limit for header request size.
In order for my application to work, I don’t need a huge authentication cookie, chances are I can disregard most of those claims as part of the cookie and load if/when needed later. My question is there a way to modify or intercept the /signin-oidc handler to trim that cookie down before it issues the redirect?
I posted the following answer, which was chosen as the accepted answer and received 2 upvotes:
After hunting around a bit more, I found this post on the IdentityServer issue tracker that lead me to the ultimate solution.
There is a .OnTicketReceived handler you can listen for, and in there you can modify the response ahead of going out as part of the authentication cookie.
.AddOpenIdConnect("oidcScheme", "Open ID Connect Display", options =>
{

    options.Events.OnTicketReceived = (ticketReceived) =>
    {
        // ensure we have an identity
        var identity = ticketReceived.Principal.Identity as ClaimsIdentity;
        if (identity != null)
        {
            // this is where you can add or remove claims, which ultimately go into the authentication cookie that is sent from /signin-oidc.
            identity.RemoveClaim(...);
        }

        return Task.CompletedTask;
    };
};
Originally posted on Stack Overflow — 2 upvotes (accepted answer). Licensed under CC BY-SA.
Monday, June 10, 2019 by Nate Bross
I’ve been struggling to setup Hyper-V networking on a laptop for a while now. Until recently I was able to work around it, and not actually solve the problem.
Its well documented, that sharing a Wireless network card in Hyper-V wont work. Since Windows 10 1709, a nifty ‘Default Switch’ has been provided to help VMs connect to the network via NAT using the hosts default connection. I could only ever get this to work intermittently. Why? Metric.
I believe this has something to do with my specific setup, so I’ll outline that too. I use my laptop in three primary modes.
- Docked which has multiple DisplayPort, USB, 3.5mm, and Ethernet ports, but I use wireless networking
- Totally mobile, not connected to anything but power, obviously wireless.
- USB-C Dock with HDMI and USB, again wireless networking.
Eventually I came to notice that it worked when I was not docked. As a diagnostic step I disabled the unused Ethernet connection, and things started working. This told me there was some issue with determining which connection the VM should use.
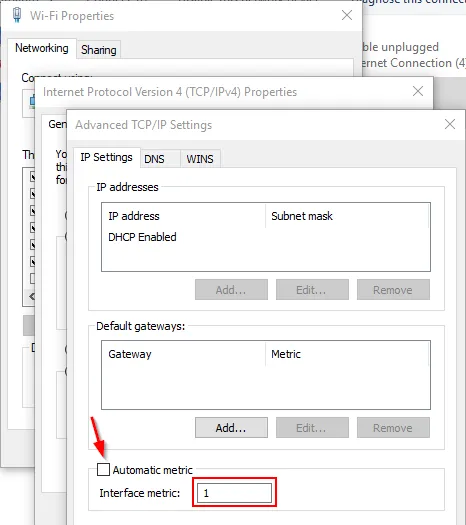
I set the Metric on my Wireless connection to 1, on my Virtual Adapter (VPN) to 2, and my Wired Ethernet to 50. Things have been working great since. Go figure.
Adapter Settings => IPv4 Properties => Advanced => Uncheck Automatic metric, and specify a value.
Tuesday, May 14, 2019 by Nate Bross
Working with the FileMaker Web View control can be a challenge on windows. The FileMaker Web View control is essentially a shim that allows us to put the MSHTML Control on a FileMaker layout. Common wisdom is that this control is “essentially IE” while true, that is misleading. By default the control operates in IE5.5 mode! There is a lot of historical information and decisions that brought us to those defaults. Fact is, it doesn’t have to remain that way. I’m going to outline how to get the MSHTML Control up to IE11 mode.
There are a couple levers we can pull to nudge the control into supporting modern standards. The Document Mode and the Input Model.
Setting up “Document Mode”
There are several ways to set the document mode that the control uses, and this behaves much like the IE the full browser. It can be specified couple ways.
This can be done many ways, depending on the server system in question. A simple way for a site hosted by IIS is to simply add this to web.config:
<system.webServer>
  <httpProtocol>
    <customHeaders>
      <clear />
      <add name="X-UA-Compatible" value="IE=Edge" />
    </customHeaders>
  </httpProtocol>
</system.webServer>
Meta tag in the body of the document rendered
Lots of examples of doing this method. Advantage to this method is that it works with a data url.
Registry setting on the computer running FileMaker Pro
Each method has benefits and drawbacks, and the later versions of FileMaker set the registry setting during install. FileMaker v16 and v17 both do. Other versions YMMV. It looks like this:
feature browser emulation registry screen shot
The input model is the flag that toggles some more modern javascript apis, such as Pointer Events, among others. This can only be controlled via a registry setting on the computer running FileMaker Pro.
To DISABLE Legacy Input Mode (which is enabled unless you do this for any MSHTML Control) you must create the following registry key:
HKEY_CURRENT_USER (HKLM requires different keys based on bitness of FMPA version)
    SOFTWARE
        Microsoft
            Internet Explorer
                Main
                    FeatureControl
                        FEATURE_NINPUT_LEGACYMODE
                            FileMaker Pro Advanced.exe = (DWORD) 00000000
The zero value tell the operating system that when “FileMaker Pro Advanced.exe” (adjust accordingly if you’re not using advanced) requests an MSHTML Control, it should disable the Legacy Input mode which is intended to support old legacy enterprise systems built for IE5.5 or IE6.
This is what it looks like prior to creating any entries:
empty registry section for legacy mode
Once you’ve pulled both levers, modern websites and controls will work much better while embedded inside your FileMaker solution. We’re still working with IE11, so rendering issues will still present themselves. Your site must account for this, but at least more modern programming APIs will be available.
Tuesday, April 16, 2019 by Nate Bross
Using built in FileMaker tooling, there is no way to see output from console.log, or other diagnostic tools when deploying some web content inside a web view control. I have found a way to do it using some freely available tools.
Here’s a little demonstration of how it works:

Using Visual Studio 2017 Community edition (download), it is possible to get access to this information. The process is simple once you know the steps.
Step 1: Open your solution to a layout with your web view control.
Step 2: Fire up Visual Studio, and use the Debug => Attach To Process menu:

Step 3: Select debugging type as “Scripting”

Step 4: Attach to the “FileMaker Pro Advanced.exe” process.
Step 5: Use Debug => Window => Script Console.

Once attached, you can view the console output and even script source and hit break points and step through code line by line. Basically anything you can do in the Internet Explorer 11 Developer Tools, you can do through Visual Studio attached to the web view control
It seems to work best if the layout has only one web view control. I’ve run into an error that Visual Studio was unable to attach to the process, and restarting FileMaker has corrected that.
For reasons I have not yet been able to understand, once you enter layout mode, you cannot attach for debugging to that instance of FileMaker anymore. You have to close FileMaker and start over. If you know why this is, or a way around it please reach out to me. I’d love to update this post with that information.
For reference, the tests above used a single file with a simple layout with a web viewer pointed at a field with this value:
data:text/html,<!DOCTYPE html><head><meta http-equiv="X-UA-Compatible" content="IE=Edge" /></head><body><button id="click">Logs</button><script>document.getElementById('click').addEventListener('click', function() { console.log('logged from click'); }, false)</script></body>
Tuesday, February 5, 2019 by Nate
SPAs, or single page applications, are all the rage these days. They have their merits, and they are beneficial for many scenarios. One issue that has plagued me repeatedly when working on SPAs is trying to define environment specific variables that are NOT KNOWN at build time. WebPack is great, and scary, and confusing all at the same time, but it packages everything up at once. If you don’t know the value at build time, you’re out of luck.
While there are dozens of ways to handle this situation, some including separate build and release pipelines with tokens, I opted for a more low tech solution. Let me set the stage before I continue, as I think it helps paint the picture around why I like this solution. My app connects to some web services, and the uri of said services will be different for each deployment. Its important to note, that my SPA and web services are hosted on different domains and setup with CORS configuration. I can’t simply use relative paths.
I created a simple config.js file and included it in the head section of my index.html (the entry point for my SPA). It looks like this:
window.api_root_url = "https://runtime-api.example.com";
window.client_id = "my-client-id-for-open-id-connect";
In my SPA code (I’m using typescript) I created a simple globals.ts file which wraps these into type safe constants.
export const apiRootUrl: string = (window as any).api_root_url;
export const clientId: string = (window as any).client_id;
and then whenever I need to reference my api endpoint or my client id I can simply import and use:
import * as globals from '@/globals';
// later on...
console.log(globals.apiRootUrl);
This works well, and provides a single file to edit on the deployed solution. It makes it easy to configure via ftp, ssh, rdp, etc.