Tuesday, April 11, 2017 by Nate Bross
Started with a simple task: Upload a file to an ASP.NET Core API Controller. The project I’m working on uses a front-end SPA framework, so the file upload is coming from javascript and not directly from an html form post.
First lets look at what I was doing wrong and then we can understand why it was wrong.
A quick peek at the client side code that pushes this data to the controller (note this is actually typescript):
// note photoFiles is bound to via Aurelia binding.
var form = new FormData() for (let i = 0; i < this.photoFiles.length; i++) {
    form.append(`files[${i}]`, this.photoFiles[i]);
}
this.http.fetch(`/api/photoUpload/${this.targetId}`, {
    method: 'post',
    body: form,
    headers: new Headers()
})
.then(response => { console.log(response); });
Since we’re loading our ‘FormData’ object into the ‘body’ of the http post, it made sense to me to wire up the ASP.NET Controller Action as follows:
public async Task photoUpload(
     [FromRoute] Guid propertyId,
     [FromBody] IEnumerable files)
{
     foreach (var file in files)
     {
         var name = file.Name;
         Console.WriteLine(name);
     }

    return new ObjectResult(null);
}
This would result an an HTTP 415 Unsupported Media Type response, before the action code ever executed.
It turns out [FromBody] actually kicks ASP.NET Core into JSON Model Binder mode; which obviously cannot handle the file data that is coming through. More information on Model Binding can be found here on Andrew Lock’s blog.
Easy enough; lets drop the [FromBody] attribute since its clearly not helping. Without going through the code again, the method is executed; however the files parameter has a count of zero.
At this point, I’ve been searching around enough to have seen a few blog posts that suggest forgoing the Model Binding and simply use the built in
var form = await Request.ReadFormAsync();

var files = form.Files;
method. I try this and it does in fact work. I see my uploaded files. Some folks would stop here with a working solution, but I like to know why something I expected to work didn’t. If the data is coming through, it should work as an action parameter as well as directly reading from the form.
Enter the [FromForm] attribute, useful in cases when you want to bind to a specific form field. Modify the above code to use [FromForm] on the IEnumerable<IFormFile> parameter from our action:
public async Task photoUpload(
    [FromRoute] Guid propertyId,
    [FromForm] IEnumerable files
)
and wait, why isn’t that working? Still getting an empty IEnumerable when the method executes. No Http 415 though, so at least its not a regression.
I went back and compared the ACTUAL http post data that was sent and compared it with a direct form post from a <form method=”post”> and noticed that there was one slight bug in the assembly of the FormData on the front-end:
var form = new FormData()
for (let i = 0; i < this.photoFiles.length; i++) {
     form.append(`files`, this.photoFiles[i]);
}
The original code was doing something like files[0], files[1], etc for each file uploaded, however, the regular <input type=”file”> control simply uses the same ‘name’ as the input tag.
Thursday, April 6, 2017 by Nate Bross
Update 2018: Umbraco has removed ‘channels’ and the underling xmlrpc package that made this work. There might be another way to get it linked up, but I haven’t spent time on it or figured it out yet.
Open Live Writer is a great, free, open source version of the late great Windows Live Writer, from the Windows Live Essentials package of yore. I’ve never been a prolific blogger, but having a nice slick thick client for formatting and image maintenance is always great. Using Umbraco and Open Live Writer works well, but it doesn’t have to be only for blogging! With Umbraco Channels you can direct content from Open Live Writer to various areas of your site.
I’ve set this up a dozen times, and every time I have to google around until I find the solution.
Umbraco Setup
Setup a channel for the user, in the Backoffice go to:
Users => Users => [Your-Account] => Content Channels (Tab)
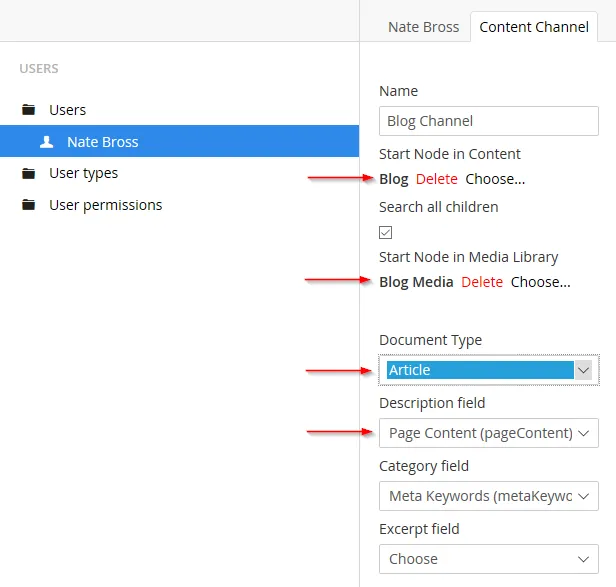
I’ve called out the important areas.
Start Node in Content: should match the folder you setup in the website.
Start Node in Media Library: useful if you want to keep all the media for your posts grouped together
Document Type: This is the document type that will be created for each Post in Open Live Writer.
Description Field: the field on the document type in which the main content will go.
Open Live Writer Setup
Website => http://www.example.com/[folder-if-setup]
User => Backoffice Username for this channel
Password => Self Explanitory
Blog Type => Metaweblog API
EndPoint => http://www.example.com/umbraco/channels.aspx
That’s the part I always forget.
What’s interesting here, is that if you want to manage multiple content sections from within Open Live Writer, you can create multiple Umbraco Backoffice users with one Channel per area in the site. Since Open Live Writer supports multiple accounts, you can link them all up and have a mostly seamless experience. Using different ‘accounts’ is a clunky way to manage multiple areas, but if you think of them as channels it makes some sense.
Wednesday, April 5, 2017 by Nate Bross
When using netcoreapp1.0 I had been using the existing Visual Studio Test task from the Build Editor (v1.x) and simply overriding the ‘path to dlls’ with a ‘path to project.json` file as outlined here.
Upon upgrading the application and all tests to netcoreapp1.1 VSTS started failing builds with the following error:
Error: 'test-xunit' returned '-2147450749'.
Running these tests locally though Visual Studio, dotnet test and vstest.console.exe all worked just fine.
Scouring the internet, you’ll find plenty of sources suggesting that you add the nuget package ‘Microsoft.DotNet.InternalAbstractions’ to your test project. In my case, this did NOT solve the problem.
The only way I could get it working was to downgrade the test projects from
Microsoft.NETCore.App : { version: 1.1.1 }

to

Microsoft.NETCore.App: { version: 1.1.0 }
I suspect that the build agent doesn’t have v1.1.1; and that is why running locally the tests always work. All I know for sure is that running it locally everything worked fine, but it would blow up on a VSTS Build Agent.
Tuesday, October 25, 2016 by Nate Bross
Someone asked on Stack Overflow:
I have a generic object table where each entry has a Key and version. So you might have
Object 1, version 1
Object 1, version 2
Object 1, version 3
Object 2, version 1
Object 2, version 2
How can I request to return the highest version of each object, ie return version 3 of object 1 and version 2 of object 2? I can’t work out how to use a Distinct query as the objects do not match, they have different versions, I want the highest version number of each object
This is my query so far
 var dbObjects = _objectStoreRepository.GetDataObjects().OrderByDescending(d => d.Version).Where(d =>
                    d.ObjectKey.ToLower().Contains(objectKey) &&
                    ((d.Status.ToLower() == request.Status.ToLower()) || string.IsNullOrEmpty(request.Status)) &&
                    d.CreatedAt <= request.AsAtTime).ToList();
But this returns all versions of each matching object, not just the highest version
I posted the following answer, which was chosen as the accepted answer:
You will want to use a .GroupBy with a Select:
var results = _objectStoreRepository
    .GetDataObjects()
    .Where(d
        => d.ObjectKey.ToLower().Contains(objectKey)
        && ((d.Status.ToLower() == request.Status.ToLower()) || string.IsNullOrEmpty(request.Status))
        && d.CreatedAt <= request.AsAtTime)
    .GroupBy(o => o.ObjectKey)
    .Select(g => g.OrderBy(x => x.Version).LastOrDefault())
    .ToList();
First you group the results by common “key” then once those are grouped we order the results inside that group by the version and take the last or default. You may need to change the Select/OrderBy to fit your exact data.
Originally posted on Stack Overflow — 0 upvotes (accepted answer). Licensed under CC BY-SA.
Friday, August 26, 2016 by Nate Bross
Someone asked on Stack Overflow:
I’m hosting WCF in an IIS, in my HttpApplication I’d like to get the WCF operation contract name (method being called) in the Application_BeginRequest method:
protected void Application_BeginRequest(object sender, EventArgs e)
{
    var request = Context.Request;
}
I get the request from the context but I’m unable to understand how to find the name of the WCF method that was called.
I posted the following answer, which was chosen as the accepted answer:
Check out the incoming HTTP Headers:
Console.WriteLine(HttpContext.Current.Request.Headers["SOAPAction"]);
This will spit out the full value, in my sample that was:
“http://tempuri.org/IService1/DoWork”
It is probably worth noting, but OperationContext.Current.IncomingMessageHeaders.Action won’t work in Application_BeginRequest because the operation hasn’t started yet, so OperationContext.Current is null.
Originally posted on Stack Overflow — 0 upvotes (accepted answer). Licensed under CC BY-SA.
Wednesday, August 3, 2016 by Nate Bross
Someone asked on Stack Overflow:
I have a component that (by part) uses an internet connection. I wrote some UnitTests to ensure that to component is working. However, I would like to test the behaviour of the component without internet connections.
So, my goal is to somehow temporary disable internet, or the whole internet connection, and reactivate after test.
I posted the following answer, which was chosen as the accepted answer and received 3 upvotes:
There are many ways in which the system could have “No Internet” and the answer really depends on what you mean.
As the accepted other answer suggests, you could simply disable the network interface. That guarantees you have no internet, but the computer also will know it has no network either.
A couple other options are
- To remove your Default Gateway (this may require setting static IP settings in the control panel, though I’m sure you could do it programmatically as well)
This way, the computer still thinks it’s connected, but it won’t have any network access except on the local subnet
- Remove DNS server settings, see above link.
This way, the computer has direct IP based access but to a regular user it would appear as if there was “no internet.”
Originally posted on Stack Overflow — 3 upvotes (accepted answer). Licensed under CC BY-SA.
Wednesday, January 20, 2016 by Nate Bross
Someone asked on Stack Overflow:
I have a finished web project ready to publish. It works fine when I run it in Visual Studio. Then I go to publish it. Visual Studio claims the publication was successful, but when I go to the site on IIS it does not work. The published file system doesn’t even have the Images folder, and the links to the Scripts and other folders don’t work.
To describe what’s happening, first I choose Build—>Publish site. I create a publish profile like so:

Then I publish it as a File System and pick the folder:

Then I publish it as Release:

Then I press Publish:

Here is the output of the publish website by Visual Studio:
------ Build started: Project: LangSite, Configuration: Release Any CPU ------ LangSite -> C:\Users\Administrator\documents\visual studio 2013\Projects\LangSite_151209\LangSite_151209\bin\LangSite_151209.dll ------ Publish started: Project: LangSite, Configuration: Release Any CPU ------ Connecting to C:\Users\Administrator\Documents\LangTestSite… Transformed Web.config using C:\Users\Administrator\documents\visual studio 2013\Projects\LangSite_151209\LangSite_151209\Web.Release.config into obj\Release\TransformWebConfig\transformed\Web.config. Copying all files to temporary location below for package/publish: obj\Release\Package\PackageTmp. Publishing folder /… Publishing folder Areas… Publishing folder Areas/HelpPage… Publishing folder Areas/HelpPage/Views… Publishing folder Areas/HelpPage/Views/Help… Publishing folder Areas/HelpPage/Views/Help/DisplayTemplates… Publishing folder Areas/HelpPage/Views/Shared… Publishing folder bin… Publishing folder Content… Publishing folder fonts… Publishing folder Scripts… Publishing folder Views… Publishing folder Views/Home… Publishing folder Views/Shared… Site was published successfully file:///C:/Users/Administrator/Documents/LangTestSite
========== Build: 1 succeeded, 0 failed, 0 up-to-date, 0 skipped ========== ========== Publish: 1 succeeded, 0 failed, 0 skipped ==========
Here is the layout of the file folders in Visual Studio:

And here is the file structure of the published site. Notice, no Images folder:

When I try to go to the site, I get a page of broken links: 

Clearly I am not using the publish web project correctly, but I don’t see any different way to do it. What am I doing wrong?
I posted the following answer, which was chosen as the accepted answer and received 1 upvote:
Chances are that your images are in the file system, but they are not in your actual project.
You’ll want to tell Visual Studio to ‘show all files’ its one of the icons in the top of the solution explorer. From there you can see the grayed out items show up under the images folder, and right click and “include in project”.
Originally posted on Stack Overflow — 1 upvotes (accepted answer). Licensed under CC BY-SA.
Wednesday, December 9, 2015 by Nate Bross
Optimizing front-end resources can be lots of fun, if you’re using a good framework for it. For your standard ASP.NET web application WebGrease and the built-in Microsoft tools work pretty darn well. Things get a little bit interesting when you start working with things like LESS or SASS as compilers for these systems can start bundling things up and making minified versions. That’s fine and good, until you need or want managed caching. That’s where server side frameworks come into play.
Enter: ClientDependency Framework. Its what powers this site. Its a nice simple framework that makes sense. The code speaks for itself, and since it lives in the views it doesn’t get lost in some .cs file.
Firstly, its available as a nuget package. In order to get started, you want to simply punch in these commands:
PM> Install-Package ClientDependency
PM> Install-Package ClientDependency-Mvc
Then you can jump right into your view code:
@{Html.RequiresCss("~/Content/Site.css");}

@{Html.RequiresJs("~/Scripts/jquery.js");}
This makes the view depend on these files, they are not rendered here, but when these views are used, the last call below knows which scripts to include:
<head>
...
@Html.RenderCssHere()
</head>
<body>
...
@Html.RenderJsHere()
</body>
ClientDependency Framework handles all the messiness of combining and minifiying these resources, adding query strings to the <script> and <link> tags so they are cached, but can be invalidated in future updates. Using this framework properly, you should never have to tell a client, just do a “hard” (CTRL + F5) refresh.
Friday, April 24, 2015 by Nate Bross
Someone asked on Stack Overflow:
I’m doing some DB Admin with an Azure database and I need to perform queries like removing all constraints in the database.
sp_MSForEachTable is not available when working with Azure databases, so I’m working on a different way to do it.
I found a snippet that drops all tables here: http://edspencer.me.uk/2013/02/25/drop-all-tables-in-a-sql-server-database-azure-friendly/ and tried modifying it to remove all constraints like I need to and came up with this result:
while(exists(select 1 from INFORMATION_SCHEMA.TABLES where TABLE_NAME != '__MigrationHistory'))
begin
    PRINT ('Disabling' + TABLE_NAME)
    declare @constraintOff nvarchar(2000)
    SELECT TOP 1 @constraintOff=('ALTER TABLE ' + TABLE_SCHEMA + '.[' + TABLE_NAME + '] ' + 'NOCHECK CONSTRAINT all')
    FROM INFORMATION_SCHEMA.TABLES
    WHERE TABLE_NAME != '__MigrationHistory'
    exec (@constraintOff)
    PRINT @constraintOff
end
It repeatedly tries to operate on the first item in the database, which would work fine if you were dropping everything but I need to loop through each table and disable its constraint like sp_MSForEachTable does.
Any tips? I’ve seen a few things here and there that claim to do this, but they’re usually two or three page long scripts that do a lot of other stuff and they make my brain hurt.
UPDATE
still working on that query, it seems like something to this end might work better but still no dice:
declare @constraintOff nvarchar(2000)
SELECT @constraintOff=('ALTER TABLE ' + TABLE_SCHEMA + '.[' + TABLE_NAME + '] ' + 'NOCHECK CONSTRAINT all')
FROM INFORMATION_SCHEMA.TABLES
exec (@constraintOff)
PRINT @constraintOff
This one still only operates on one table, but at least it’s not an infinite loop :)
I posted the following answer, which was chosen as the accepted answer and received 7 upvotes:
While this link is for Amazon RDS, it does provide specific code to disable constraints without sp_MSForEachTable
Importing and Exporting SQL Server Data
-- Manually specify database name - a safeguard in case you paste this into the wrong SSMS window.
USE [staging]

-- Change this line if you want to enable (1) or disable constraints:
DECLARE @enable_constraints bit = 0

--Don't change anything below this line.
DECLARE @schema_name SYSNAME
DECLARE @table_name  SYSNAME

DECLARE table_cursor CURSOR FOR
SELECT
    schemas.name,
    tables.name
FROM
    sys.tables
    INNER JOIN sys.schemas ON tables.schema_id = schemas.schema_id

OPEN table_cursor
FETCH NEXT FROM table_cursor INTO @schema_name, @table_name

DECLARE @cmd varchar(200)
WHILE @@FETCH_STATUS = 0
BEGIN
    SET @cmd = 'ALTER TABLE ' + QUOTENAME(@schema_name) + '.' + QUOTENAME(@table_name) + ' '
    SET @cmd = @cmd + (CASE WHEN @enable_constraints = 1 THEN 'CHECK' ELSE 'NOCHECK' END) + ' CONSTRAINT ALL'

    PRINT @cmd
    EXEC( @cmd )

    FETCH NEXT FROM table_cursor INTO @schema_name, @table_name
END

CLOSE table_cursor
DEALLOCATE table_cursor
Notable comments
tumtumtum (4 upvotes): For disabling it should be SELECT @cmd = 'ALTER TABLE '+QUOTENAME(@table_name)+' WITH NO CHECK CONSTRAINT ALL'; And for re-enabling it should be: SELECT @cmd = 'ALTER TABLE '+QUOTENAME(@table_name)+' WITH CHECK CHECK CONSTRAINT ALL';
Originally posted on Stack Overflow — 7 upvotes (accepted answer). Licensed under CC BY-SA.
Sunday, April 19, 2015 by Nate Bross
Someone asked on Stack Overflow:
I can select the sum by year, which is easy.
Just like this.
var query = from t in ctx.SomeDataEntity
                            group t by t.DateAdded.Year into g
                            select new
                            {
                                Year = g.Year,
                                Total = g.Sum(t => t.SomeColumn1) +
                                g.Sum(t => t.SomeColumn2) +
                                g.Sum(t => t.SomeColumn3) +
                                g.Sum(t => t.SomeColumn4)
                            };
But, how to filter the data by every month? It is not easy as simply replacing t.DateAdded.Year to t.DateAdded.Month, cause t.DateAdded.Month is 1,2,3,…,12. I need the one is in format of 2014-01,2014-02,…,2014-12.
I posted the following answer, which was chosen as the accepted answer and received 3 upvotes:
You can group by both Year and Month like this:
var query = from t in ctx.SomeDataEntity
                    group t by new
                    {
                        Year = t.DateAdded.Year,
                        Month = t.DateAdded.Month
                    } into g
                    select new
                    {
                        MonthAndYear = g.Key.Year + "-" + g.Key.Month,
                        Total = g.Sum(t => t.SomeColumn1) +
                        g.Sum(t => t.SomeColumn2) +
                        g.Sum(t => t.SomeColumn3) +
                        g.Sum(t => t.SomeColumn4)
                    };
Notable comments
Nate (0 upvotes): @GiorgiNakeuri 1) good catch, you need the .Key property, 2) its just an int.
Originally posted on Stack Overflow — 3 upvotes (accepted answer). Licensed under CC BY-SA.